


🚚 Limited-Time Offer (Through Sep 30, 2026):
Enjoy FREE SHIPPING on all Flyers, Business Cards & Stickers—no minimum required!
Custom Desk Calendars
That Keep Your Brand on Every Desk
A desk calendar is the rare marketing piece nobody throws away. It sits on a client's desk for twelve months, in view every single working day. Our custom desk calendars are printed at our own production site in Korea on premium 10pt glossy or 240gsm Rendezvous paper, finished with deluxe matte silver twin rings, and built on a sturdy tripod stand. RedPrinting imports every order into the United States and delivers it to you, with shipping and customs duties both included in the price. Choose the Template Design option and our team handles the entire layout for you. You send your logo and photos, we build the calendar around them.

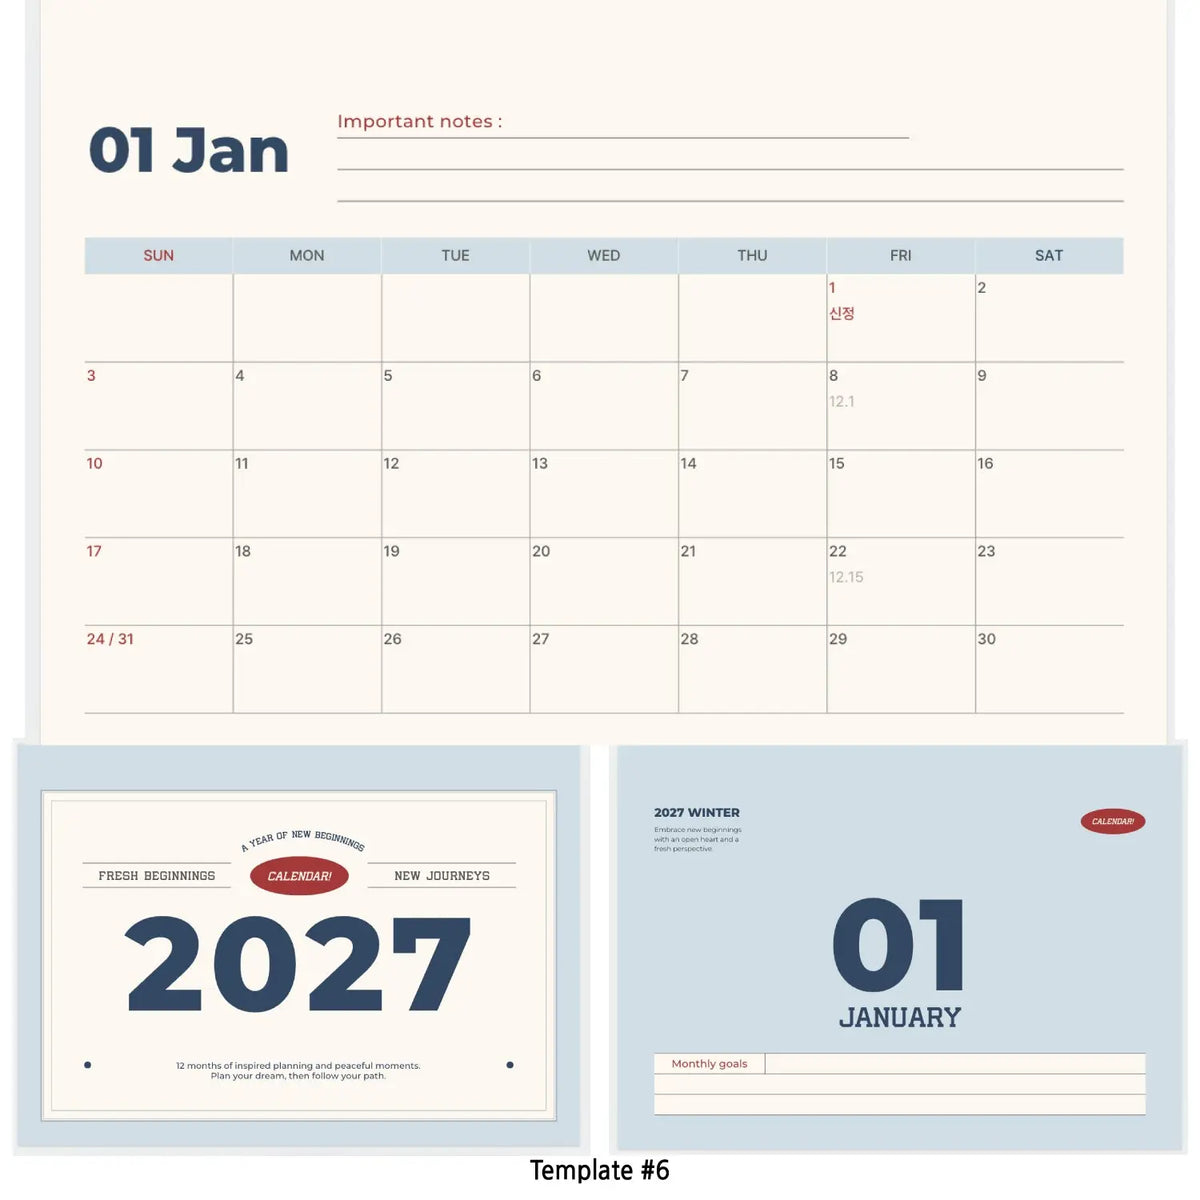
Desk Calendar Template Designs
No designer on staff? Pick the Template Design option and we build the whole desk calendar around your brand.
Most desk calendar printers hand you a blank spec sheet and wish you luck. We offer a different path. Select Template Design when you order and our design team takes it from there: you send us your text and the photos your template calls for, we lay out all twelve months, and you approve a finished proof before anything goes to press. Below are the template layouts you can choose from.
Assembled calendar, including the tripod stand: 260 x 190 mm (about 10 1/4" x 7 1/2")
Every template above is built to these dimensions, so your photos should be supplied at the sizes given in the image specification sheet we send after ordering.


Why Choose Our Custom Desk Calendars?
Twelve months of brand presence, printed to a standard that earns its place on the desk.
A Full Year of Daily Brand Exposure
Template Design Service Included as an Option
Two Premium Paper Stocks to Choose From
Deluxe Matte Silver Twin Ring Binding
Gold or Silver Foil Stamping, Included in the Price

Offset Printing at 500 Units and Above
Matching Printed Envelopes on Request

Lower Prices, Never Lower Quality
Custom Desk Calendar Pricing
Minimum order 100 units. Digital printing below 500 units, offset printing at 500 and above.
| Quantity | Standard Unit Price |
Standard Total |
Premium Unit Price |
Premium Total |
|---|---|---|---|---|
| 100 | $4.99 | $499.00 | $5.49 | $549.00 |
| 200 | $3.99 | $798.00 | $4.99 | $998.00 |
| 300 | $3.49 | $1,047.00 | $4.49 | $1,347.00 |
| 400 | $2.99 | $1,196.00 | $3.99 | $1,596.00 |
| 500 Popular | $2.49 | $1,245.00 | $3.49 | $1,745.00 |
| 1,000 | $2.29 | $2,290.00 | $2.99 | $2,990.00 |
Free shipping to any US address. Your desk calendars are printed in Korea and brought to the US by RedPrinting, and both the ocean freight from our Korean production site and the onward delivery to your door are already included in the price. Local pickup in Chatsworth is available at the same price.
Prices exclude design and tax. The only shipping charge that can be added is the optional air freight upgrade, which is billed separately.
Final pricing is confirmed upon receipt of your finished, print-ready PDF or your completed template content form.
How Your Custom Desk Calendar Gets Made
From order to approved proof in five steps.
Desk Calendar Production and Shipping
Six weeks by sea at no extra cost, or three weeks by air. Duties are on us either way.
Custom Desk Calendar Specifications
Everything you need to plan your artwork and your budget.
| Standard Paper | 10pt Premium Glossy Paper |
| Premium Paper | 240gsm Rendezvous |
| Paper Size | 260 x 160 mm (about 10 1/4" x 6 1/4") |
| Tripod Height | 30 mm (about 1 1/8") |
| Overall Size | 260 x 190 mm (about 10 1/4" x 7 1/2") |
| Page Count | Single-sided cover page plus 12 to 15 sheets |
| Inside Printing | Single-sided or double-sided |
| Binding | Deluxe matte silver twin rings (standard). Black or gold available by phone request after ordering |
| Foil Stamping | Gold or silver foil at the base of the calendar, included in the price |
| Envelopes | Printed envelopes available at $0.20 per unit. Call to add them to your order |
| Printing Method | Digital below 500 units, offset at 500 units and above |
| Minimum Order | 100 units |
| Artwork Format | Print-ready PDF, or our content form if you select Template Design |
| Design Revisions | Two rounds included, $50 per additional round |
| Lead Time | About 6 weeks (2 weeks production plus about 1 month ocean freight) |
| Air Freight Upgrade | About 3 weeks total. $150 per 45 lbs, charged on measured weight before dispatch |
| Customs Duties | Paid by RedPrinting on both ocean and air shipments |
| Not Included | Design fee and tax. Shipping to any US address is included |
Who Orders Custom Desk Calendars
Any business that wants to stay on a client's desk for twelve months.
Custom Desk Calendar Printing FAQ
Design service, content submission, lead times, and shipping.
1Do you design the desk calendar for me?
Yes, if you select the Template Design option when you order. Pick one of the template layouts shown above and our design team lays out the entire desk calendar for you.
If you already have finished artwork, you can skip the option and send us a print-ready PDF instead.
2What do I need to send after I place my order?
After your order is placed we email you a content form and an image specification sheet. Fill in your company information, the dates you want highlighted, and any text for each month, then return it with your photos sized to the specification.
We can only start production once that material is back with us, so returning it quickly is the fastest way to get your desk calendars on time.
3Do I need to supply my own photos?
Yes. The Template Design option covers the design work, but the photographs have to come from you. Each template is built around a specific set of images, and the image specification sheet we email after ordering tells you exactly how many you need and at what size.
Send them back with your completed content form and we take care of everything else.
4How many design revisions are included?
We send you a final design proof, and two rounds of revisions are included at no charge. Any additional round after those two is billed at $50.
Collect all of your feedback into a single list for each round rather than sending changes one at a time, and two rounds is usually more than enough.
5How long does a custom desk calendar order take?
Production in Korea takes about two weeks, and ocean freight to the US takes about one month, so plan on roughly six weeks from approved content to arrival.
That clock starts when your final content is approved, not when you place the order. For a January start, order by early autumn.
6Can I get my desk calendars faster than six weeks?
Yes. Air freight brings the total down to about three weeks and costs $150 per 45 lbs. We weigh your finished order before it leaves Korea and send you a separate payment link for the actual measured weight, so you pay for what your order really weighs rather than an estimate.
Call us before ordering and we will project the likely air freight cost from your quantity and paper choice.
7Do I have to pay customs duties?
No. RedPrinting pays the customs duties on your order, whether it travels by sea or by air. The air freight upgrade covers transport only and does not change who pays duty.
8Can I pick up my order instead of having it shipped?
Yes, and either way the price is the same. Your desk calendars are printed in Korea and imported by RedPrinting, and both the ocean freight and delivery to any US address are already included in the listed price.
Pickup is available at our Chatsworth warehouse and the current address is listed in the footer of every page on RedPrinting.com. The only shipping charge we ever add is the optional air freight upgrade.
9What is the difference between the Standard and Premium paper?
Standard is 10pt premium glossy paper, a bright, clean sheet with a glossy surface that keeps photography sharp and text highly legible. It is the right choice for most corporate desk calendars.
Premium is 240gsm Rendezvous, a textured fine art stock. It weighs slightly less on paper but feels more substantial in the hand because of its surface, and it pairs especially well with foil stamping for high-end client gifts.
10What is the minimum order for custom desk calendars?
The minimum is 100 units. Orders below 500 units print digitally, and orders of 500 units and above print on offset presses, which is where the unit price drops most sharply.
Call us before you order and we will confirm quantity, paper, template choice, and your delivery window.
Design Templates That Make
Every File Print-Ready
Download free design templates for all RedPrinting products. Each template includes the correct trim size, bleed, and safe margin, so your artwork prints exactly the way you designed it.
Sticker Templates
Individually cut stickers in every shape and size, plus multi-design sticker sheets.
Business Card Templates
Standard, mini, and square formats for every card design.
Artwork Guidelines That Get
Every File Print-Ready
Every file submitted to RedPrinting is reviewed by a real person before it goes to press. This guide walks you through file formats, resolution, bleed, and cut lines — so your stickers, labels, and cards come out exactly the way you designed them.
Not a Designer? We'll Handle It
Free artwork setup is included with every order.
You don't need design software or print experience to order from us. Send us your image in any common format and our in-house design team will build the print file for you — adding bleed, positioning the cut line, and adjusting the resolution at no extra charge.
If your artwork needs a change we can't make on our own, we'll email you before printing. Nothing goes to press without your approval.
The Three Lines on Every Template
Understand these and your file will cut clean every time.

Accepted File Formats
Vector files give the sharpest results, but we accept high-resolution raster files too.
| Format | Type | Best For | Recommended |
|---|---|---|---|
| AI | Vector | Logos, text, line art, custom shapes | Best |
| Vector | Print-ready files with fonts outlined | Best | |
| EPS | Vector | Legacy vector artwork | Best |
| PSD | Raster | Layered photo-based designs | Good |
| PNG | Raster | Designs needing a transparent background | Good |
| JPG | Raster | Photographs and full-color images | Good |
| TIFF | Raster | High-quality scanned or photo artwork | Good |

- Outline your fonts – Convert all text to outlines or curves so typefaces render correctly on our end.
- Use CMYK color mode – Printing is a CMYK process. RGB files are converted automatically, and bright neon or vivid blues may shift slightly.
- Flatten transparency – Complex transparency and drop shadows can behave unpredictably; flatten them before exporting.
- Embed or attach linked images – Missing links are the most common reason a file gets sent back.
Image Resolution
300 DPI at final print size is the target.
Resolution is measured at the size the artwork will actually be printed. A 300 DPI image looks crisp on a 2-inch sticker but turns soft when stretched across a 24-inch poster. Always check the pixel dimensions against the finished size, not against how the file looks on screen.
Web images pulled from a website or social media are usually 72 DPI, which is roughly a quarter of the detail we need. Enlarging a low-resolution file doesn't add detail back — it only makes the softness more visible.
Low-quality artwork? Send it anyway. Our designers will do everything possible to bring it up to print standard, and we'll tell you honestly if a file won't hold up.

Choosing Your Material
Where the sticker will live decides which stock to use.
- Waterproof and tear-resistant
- Resists fading from sun and weather
- Holds up on bottles, laptops, and cars
- Higher cost per sticker
- Thin, smooth, and easy to write on
- Noticeably lower cost per sticker
- Ideal for packaging, boxes, and mailers
- Not water- or weather-resistant
Clear stickers are printed on transparent vinyl, so the surface underneath becomes part of the design. They're waterproof, tear-resistant, and work beautifully on glass bottles, cups, laptops, and windows where a white sticker edge would look out of place.
Because there's no white backing, light colors and white ink behave differently than they do on paper. Designs with bold shapes, dark colors, or deliberate negative space tend to read best.
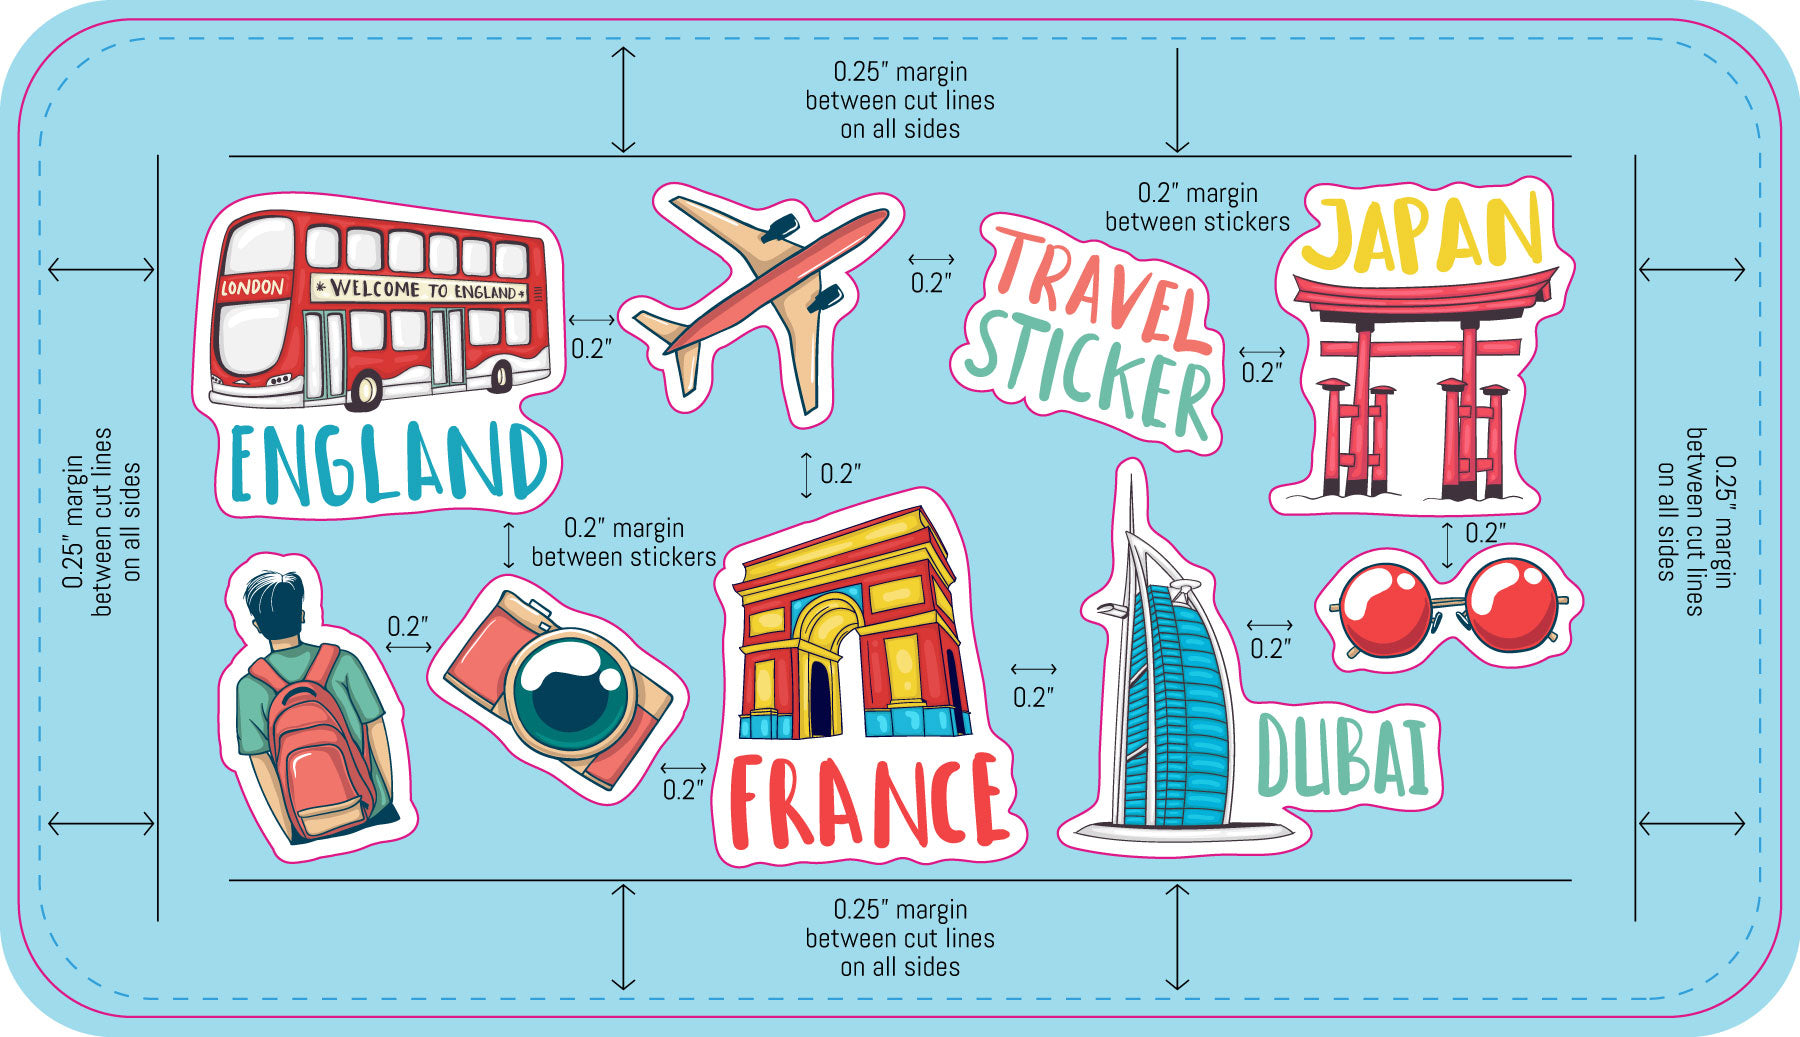
Setting Up Sticker Sheets
Multiple designs and sizes on a single sheet.
Sticker sheets let you print several different designs together on one backing sheet. Our sheet templates come pre-populated with placeholder artwork that you replace with your own files.
Common Mistakes to Avoid
The issues that most often send a file back for revision.
- No bleed on the background – Artwork that stops at the die line leaves white edges when the cut shifts. Extend it a full 0.075 inch past the finished edge.
- Text too close to the edge – Anything outside the safe area can be trimmed off. Pull text and logos at least 0.075 inch inside the die line.
- Low-resolution images – Artwork saved from a website prints soft and pixelated. Work from the original high-resolution file whenever possible.
- Live fonts not outlined – Fonts we don't have installed get substituted. Convert all type to outlines before exporting.
- RGB color mode – Vivid RGB colors can't always be matched in CMYK. Design in CMYK to see accurate colors from the start.
- Die line left in the artwork – The cut line is a guide, not a design element. Remove it or keep it on its own separate layer.
- Wrong template size – Make sure the template you downloaded matches the size you actually ordered.
From File to Finished Print
What happens after you place your order.