


🚚 Limited-Time Offer (Through Sep 30, 2026):
Enjoy FREE SHIPPING on all Flyers, Business Cards & Stickers—no minimum required!
Introducing our Custom Disposable Paper Cups: The Eco-Friendly Choice with a Competitive Edge!
These small quantity colored paper cups are not produced for events or fancy purposes. They are made using UV offset printing, making them suitable for use in restaurants and cafes.
If you're on the hunt for custom disposable paper cups that stand out, look no further. Our eco-friendly paper cups are a step above the rest, boasting thicker paper material compared to our competitors. What's more, we offer them at an incredibly affordable price without compromising on quality.
Custom 16 oz Paper Cups
|
Buy 1,000/Case |
Price Per Piece |
Price Per Box |
|
1-2 Cases |
0.2199 |
219.99 |
|
3-4 Cases |
0.2099 |
209.99 |
|
5-9 Cases |
0.1999 |
199.99 |
|
10+ Cases |
0.1959 |
195.99 |
Key Features:
-
Custom Design: Personalize your disposable paper cups with full-color printing, transforming them into a canvas for your brand, logo, or artwork. Make your mark and leave a memorable impression on your customers.
-
Eco-Friendly: We're committed to sustainability, and our paper cups reflect that. Crafted from environmentally friendly materials, you can feel good about your choice while reducing your carbon footprint.
-
Food Container Use Grade Certification: We completed a non-toxic test certificate proving that the material and printing ink of the paper cup are suitable for use with food.
-
Exceptional Thickness: We use 290gsm biodegradable paper, so our paper cups are built to be robust, making them sturdier and more reliable than what you'll find elsewhere. No more worrying about leaks or spills.
-
Affordable Pricing: We believe that quality doesn't have to break the bank. Our custom disposable paper cups are competitively priced, ensuring you get the best value for your money.
-
Free Shipping: Now with FREE Shipping in the US.
-
Low Minimum: 1,000 cups(1 box)
-
LEAD TIME(Turnaround Time): 2 Weeks
LEAD TIME(Turnaround Time): 1 Weeks(Rush Process, $100 Rush fee)
Upgrade your brand's presentation, promote sustainability, and save on costs with our custom disposable paper cups. Make the smart choice today and give your customers an eco-friendly, high-quality beverage experience.
Match color value
Small quantity colored paper cups are printed together with multiple orders, making it impossible to match exact color values. Instead, they are printed according to standardized color profiles.
If you want to match specific color values, you can order more than 10,000 paper cups, which will be printed individually to achieve the desired color values. For this, you need to specify the overall color values or certain color values using Pantone colors and provide us with a document explaining the color values in your file.
File Guideline for Custom Paper Cups & the Template File Download.
Can I get my order faster?
We offer rush production. Rush production requires a completed design template file. Our rush processing for Custom Paper Cups is available in two options.
The first option can be completed within 10 days from production to delivery, while the second option has a timeline of 2-3 weeks.
To check rush processing products, please click here.
Design Templates That Make
Every File Print-Ready
Download free design templates for all RedPrinting products. Each template includes the correct trim size, bleed, and safe margin, so your artwork prints exactly the way you designed it.
Sticker Templates
Individually cut stickers in every shape and size, plus multi-design sticker sheets.
Business Card Templates
Standard, mini, and square formats for every card design.
Artwork Guidelines That Get
Every File Print-Ready
Every file submitted to RedPrinting is reviewed by a real person before it goes to press. This guide walks you through file formats, resolution, bleed, and cut lines — so your stickers, labels, and cards come out exactly the way you designed them.
Not a Designer? We'll Handle It
Free artwork setup is included with every order.
You don't need design software or print experience to order from us. Send us your image in any common format and our in-house design team will build the print file for you — adding bleed, positioning the cut line, and adjusting the resolution at no extra charge.
If your artwork needs a change we can't make on our own, we'll email you before printing. Nothing goes to press without your approval.
The Three Lines on Every Template
Understand these and your file will cut clean every time.

Accepted File Formats
Vector files give the sharpest results, but we accept high-resolution raster files too.
| Format | Type | Best For | Recommended |
|---|---|---|---|
| AI | Vector | Logos, text, line art, custom shapes | Best |
| Vector | Print-ready files with fonts outlined | Best | |
| EPS | Vector | Legacy vector artwork | Best |
| PSD | Raster | Layered photo-based designs | Good |
| PNG | Raster | Designs needing a transparent background | Good |
| JPG | Raster | Photographs and full-color images | Good |
| TIFF | Raster | High-quality scanned or photo artwork | Good |

- Outline your fonts – Convert all text to outlines or curves so typefaces render correctly on our end.
- Use CMYK color mode – Printing is a CMYK process. RGB files are converted automatically, and bright neon or vivid blues may shift slightly.
- Flatten transparency – Complex transparency and drop shadows can behave unpredictably; flatten them before exporting.
- Embed or attach linked images – Missing links are the most common reason a file gets sent back.
Image Resolution
300 DPI at final print size is the target.
Resolution is measured at the size the artwork will actually be printed. A 300 DPI image looks crisp on a 2-inch sticker but turns soft when stretched across a 24-inch poster. Always check the pixel dimensions against the finished size, not against how the file looks on screen.
Web images pulled from a website or social media are usually 72 DPI, which is roughly a quarter of the detail we need. Enlarging a low-resolution file doesn't add detail back — it only makes the softness more visible.
Low-quality artwork? Send it anyway. Our designers will do everything possible to bring it up to print standard, and we'll tell you honestly if a file won't hold up.

Choosing Your Material
Where the sticker will live decides which stock to use.
- Waterproof and tear-resistant
- Resists fading from sun and weather
- Holds up on bottles, laptops, and cars
- Higher cost per sticker
- Thin, smooth, and easy to write on
- Noticeably lower cost per sticker
- Ideal for packaging, boxes, and mailers
- Not water- or weather-resistant
Clear stickers are printed on transparent vinyl, so the surface underneath becomes part of the design. They're waterproof, tear-resistant, and work beautifully on glass bottles, cups, laptops, and windows where a white sticker edge would look out of place.
Because there's no white backing, light colors and white ink behave differently than they do on paper. Designs with bold shapes, dark colors, or deliberate negative space tend to read best.
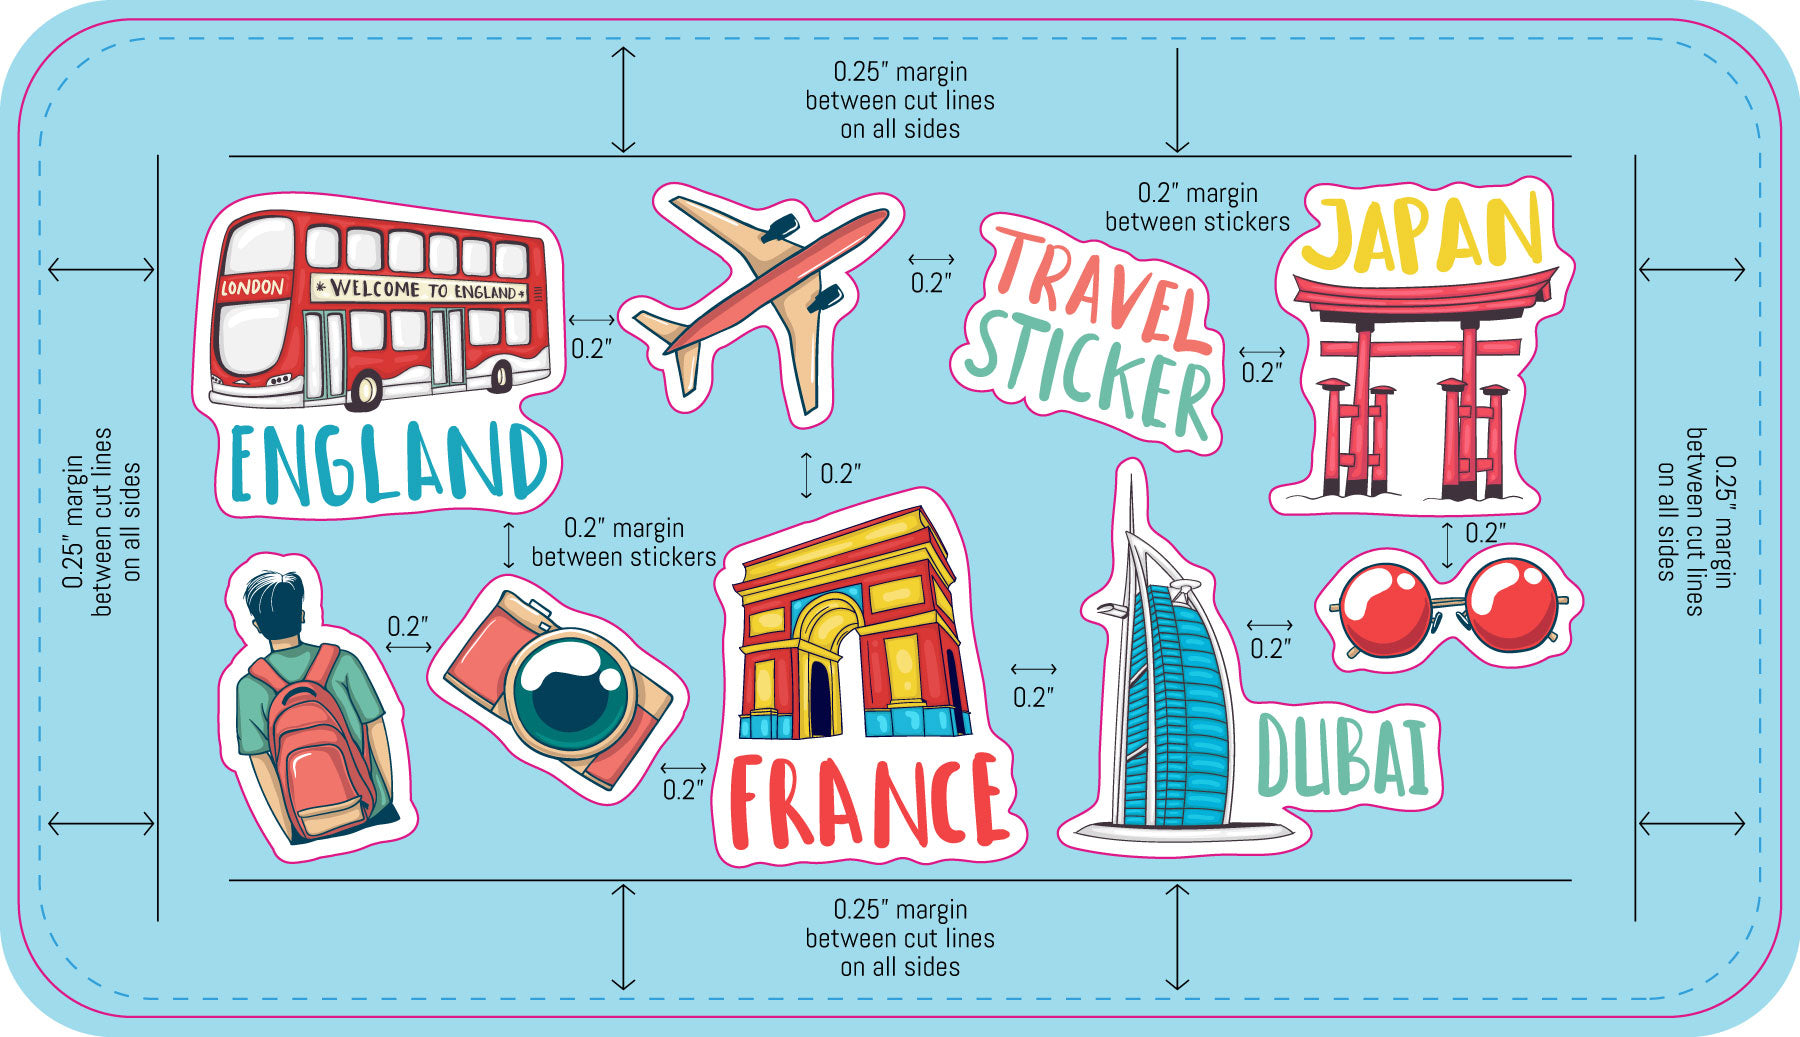
Setting Up Sticker Sheets
Multiple designs and sizes on a single sheet.
Sticker sheets let you print several different designs together on one backing sheet. Our sheet templates come pre-populated with placeholder artwork that you replace with your own files.
Common Mistakes to Avoid
The issues that most often send a file back for revision.
- No bleed on the background – Artwork that stops at the die line leaves white edges when the cut shifts. Extend it a full 0.075 inch past the finished edge.
- Text too close to the edge – Anything outside the safe area can be trimmed off. Pull text and logos at least 0.075 inch inside the die line.
- Low-resolution images – Artwork saved from a website prints soft and pixelated. Work from the original high-resolution file whenever possible.
- Live fonts not outlined – Fonts we don't have installed get substituted. Convert all type to outlines before exporting.
- RGB color mode – Vivid RGB colors can't always be matched in CMYK. Design in CMYK to see accurate colors from the start.
- Die line left in the artwork – The cut line is a guide, not a design element. Remove it or keep it on its own separate layer.
- Wrong template size – Make sure the template you downloaded matches the size you actually ordered.
From File to Finished Print
What happens after you place your order.